Thursday, March 26, 2020

Anytime is a good time for PANCAKES

Here are the rules...these pancakes contain chocolate and butterscotch chips so no syrup needed.  Since no syrup needed, no silverware needed.  Serve on paper plates and eat with your hands.  And leftovers the next day can be heated in the microwave for 12 seconds.  I use the large glass measuring cup to melt my butter and then I add the milk and egg directly to the butter and mix.  Once bowl for dry ingredients and no other dishes needed.  I have a panini press than opens flat with griddle plates that serve as the best non stick platform ever (plus clean up is simply a wet paper towel).  I use a fork to mix pancake bater, an ice cream scoop to pour and a spatula to flip.  When was the last time you had pancakes for dinner......

Follow along below or Click here to print
Once the recipe pops up, just use your "file" menu to print 


Celeste's Favorite Pancakes 

Ingredients:
1 1/2 cups all purpose flour 
3 1/2 teaspoons baking powder 
1 teaspoon kosher salt 
3 Tablespoons sugar 
1 egg 
3 Tablespoons butter, melted 
1 1/4 cup milk 
(I have used whole, buttermilk and 
lowfat milk with a splash of heavy cream) 

Optional:  Mini chocolate chips and butterscotch chips 

Directions:
In a large bowl combine flour, baking powder, salt and sugar, stir 

In a heatproof glass bowl, melt the butter, add the milk, crack the egg and mix until well blended. 

Add wet ingredients to dry ingredients and mix until blended.  

At this point I add the mini chocolate chips to the batter and mix.  I add the butterscotch chips when I pour in pan.  

Ladle pancakes onto hot non-stick pan or griddle (this way you don’t have to use butter) 
Add butterscotch chips before you flip, a few per pancake
Cook on both sides until golden brown 

We serve these hot, without syrup and we eat with our hands.  

Note:  If you have a glass measuring cup, use that to melt your butter first, than pour milk in directly and crack your egg.  Makes for less dishes to clean.  

Monday, March 23, 2020

Bored?

OK....let's do some crafting.   These salt ornaments are super easy to make, really fun to paint and will use only pantry ingredients.  Make the dough, form the ornaments with cookie cutters and then bake them to harden.  Spread out an old sheet or towel on the kitchen table and paint away as a family.   My family has made these as Christmas ornaments and gift tags.  One year my Dad helped paint (see below) and his ornament is our most treasured...it's also really good!  You can use circles to make monogram wine tags, use Halloween cutters to create spooky ornaments you can hang on a branch for your October table or get a head start on the Christmas holiday ornament exchange.   Be sure to make a hole in the ornament before you bake...we use a new pencil to poke a hole.  

Click here to print my Salt Ornaments  Recipe 
or follow along below 


Salt Ornaments

Recipe courtesy of Celeste Podojil

2 cups salt (not kosher salt)
4 cups all purpose flour
2 cups luke warm tap water
(I also add lavender or grapefruit extract, peppermint would be fun too) 

In the bowl on a stand mixer fitted with a dough hook (this works best) combine the salt and flour.  

Turn on medium setting and slowly add the water.  

Mix/knead for about 5 minutes.  

The dough will be soft and shouldn’t be sticky.  
If too sticky you can add more flour, 
a Tablespoon at a time.  
After using the stand mixer, I hand knead as well.  

You can do this by hand but add kneading time by 
hands to 7 minutes or until dough is soft to the 
touch and not sticky.  Start in a bowl with a wooden 
spoon and add to a floured surface to knead until soft. 

You can store it in a Ziploc at this point to use in a few days. 

If you are ready to go, flour your surface and roll the dough out to about ¼ inch thick.  

Cut shapes with cookie cutters and place on a cookie sheet over parchment paper.   
If you want to use as ornaments at this point take a new pencil and poke a hole in the top of the ornament for your hook (use the unsharpened side of a pencil).  

You can dry them for a few days or bake them at 200 degrees for 45 minutes-3 hours or until they harden.


You can paint them with craft paint (don’t forget the back) and when dry modge podge both sides….you can also use a spray polyurethane but it turns white paint yellow after some time. 


You can add to your tree, gifts, wine bottles, use as tags (write on back with sharpie) or they make cute placeholders at your holiday table. 


Wednesday, January 1, 2020

Leftover Turkey Chili

I don't know why I don't make turkey more often during the year.  It is delicious, really easy and the leftovers are coveted in our house.   This recipe uses every part of the bird but you can also make this with smoked turkey you buy at the store...just omit salt becasue smoked turkey is really salty.   I like this chili because it is light and more like a soup plus I prefer white beans and this recipe lends itself nicely to great northern beans.  My other favorite thing about chili is you can make a huge batch, freeze half and invite friends over for a bowl of chili with lots of toppings.  Our family always uses large corn chips instead of spoons and therefore the dish is super fun to eat!  
Watch the 3 minute "how to" video below 


Follow along below or Click here to Print

When the recipe pops up, just use your file menu to print 


Tailgating Tidbits 
Leftover Turkey Chili 
Recipe courtesy of Celeste

This recipe uses your leftover turkey in the dish and the bones 
to make stock for the chili.  


Ingredients for stock:
1/2 medium Vidalia onion, cut in quarters
8-10 cloves of garlic, leave whole
3 ribs celery, cut in large chunks 
2 carrots, cut in large chunks 
The stems from your cilantro

Place the above items in your crockpot, add your turkey bones with any leftover skin and cover with water.  
Add any spices you want, 1 teaspoon of each or just a pinch.   I always add salt, pepper, herbs de Provence, thyme, fennel seeds and turmeric (for health benefits).  

Cover with water and place on low for 24 hours.  

Strain the broth into mason jars using a fine mesh strainer.   You need 2 cups for the chili. 

You can freeze the broth or make soup, risotto or drink it to warm you up!   You may find a layer of fat on the top as it cools. I usually scrap that off and freeze it to use in matzo balls.  You can use or discard. 

Ingredients for chili:

1/2 medium Vidalia onion, chopped
8-10 cloves of garlic, chopped
3 ribs celery, chopped
2 carrots, chopped
6 scallions, chopped
½ jalapeno chopped (optional) 
A handful of cilantro, chopped 
2 cans of Great Northern Beans, do not drain or rinse 
3 Tablespoons olive oil
1 beer, dark beer preferred 
1 teaspoon each:
Kosher Salt, Cumin, Paprika ( I use both Sweet Hungarian and Spanish Smoked Paprika , Turmeric, herbs de Provence, thyme and any other spices you like especially for heat.  
1 Tablespoon of chili powder 


For the chili: 

Heat 3 T olive oil in a huge stock pot with a few cracks of black pepper, add the chopped onion, garlic, carrots, celery, jalapeno for about 8-10 minutes to soften the veggies.  

Add two cans of beans, 1 can of beer, 2 cups of your turkey broth, all the spices, half your chopped scallions and cilantro and simmer over low heat for about an hour.  

Serve with shredded cheese, sliced scallions, sour cream, lime wedges,  cilantro and hot sauce.  


Thursday, November 7, 2019

Fried Pickles....Yes Please

These are addicting, delicious and really fun to make and eat.  I made these twice in one week, once for Tailgating Tidbits and again during a Halloween pre-party while we all stood around the kitchen.  If everyone is going to stand in the kitchen anyway might as well fry some pickles.  The dilly dip is an old recipe of my moms and it is incredible....you can dip anything in it, the horseradish and paprika give it a flavor you can't get in a bottle, plus, you can sub greek yogurt in you want something lower in calories.  Below are the pictures, video and recipe....get ready to step up your tailgating appetizer game this football season!

Watch the 2 minute fried pickle "How To" video below!  


Follow along below or click here to print
Once the recipe pops up, just use your file menu to print


Tailgating Tidbits 
Fried Pickles and Dilly Dip 
Recipe courtesy of Celeste

Ingredients:
Kosher dill pickle slices or spears or both  
2 cups flour 
1 Tablespoon garlic powder 
1 Tablespoon smoked paprika 
1/2 Tablespoon  kosher salt 
1/2 Tablespoon cracked black pepper 
Optional:  1 Tablespoon Tony Chachere’s
Cajun seasoning 
1 cup Buttermilk 
2 cups Panko Breadcrumbs 
Peanut oil (can use canola) in sauté pan or med size pot 

Instructions:
Add panko breadcrumbs to a plate or shallow bowl.   
Mix flour with seasonings, set aside 

Drain and dry pickles by placing them on paper towels and blotting

Toss pickles in seasoned flour and place on a sheet of wax paper or parchment 

Once all pickles are coated in flour, add  buttermilk to flour slowly.  You want a thick pancake batter consistency.  


Coat pickles in batter and then coat both sides in panko.  You can fry immediately or add back to wax paper, clean dishes and wait for friends to show up to fry. 


Heat oil on medium heat (you will know it is ready when it dances, or when you throw in a panko breadcrumb and it sizzles)  The pickles take a minute on each side, or until golden brown.  Transfer to a wire rack or paper towels.

Serve warm with dilly dip (recipe below) 


Dilly Dip Ingredients:
1 pint of sour cream (can use reduced fat)
1 clove garlic, minced fine
1 1/3 tablespoon Horseradish
1Tablespoon fresh dill 
1 Tablespoon Paprika
1 Tablespoon Dried Chives
1 Teaspoon Salt
1 Teaspoon Black Pepper
1 Teaspoon Dried Tarragon 
1/4 Teaspoon Garlic Salt

Mix all ingredients together and chill

Sunday, October 27, 2019

Meatless Monday, all week long

I love a good burger and fries, however given the choice, I always pick a veggie burger because it makes me feel better about finishing every last fry on my plate.  Exactly the same way I order a non-fat white chocolate mocha but still get the whipped cream, normal, right?  For this recipe, I tried to keep everything simple and flavorful yet didn't want to spend hours chopping.  I read a few recipes and combined a few techniques and found that farro was a great alternative to bread crumbs and baking the black beans first dries them out enough to ensure the burgers aren't too wet.  Brown rice can be substituted for farro for my gluten free friends and you can change up the seasoning every time you make this.  I also found making the burgers in advance, wrapping in wax paper and letting them sit in fridge for a few hours was really helpful to keep them from falling apart.  This recipe also works great if you are making guacamole at the same time because you can use cilantro, jalepenos and the spices in both dishes.   Soft buns, your favorite deli cheese sliced thinly and a side of fries will make you forgot this burger has no meat!


As always, you can watch the 3 minute video or 
click below to print the recipe, 

or watch and read the recipe! 


Follow along below or click here to print
Once the recipe pops up, just use your file menu to print


Tailgating Tidbits 
Mexican Black Bean Burger 
with Spicy Gouda Cheese
Recipe courtesy of Celeste

Ingredients: 
Two cans black beans, drained and rinsed 

1/2 teaspoon cumin 
1/2 teaspoon paprika 
1 Tablespoon salt 
A few cranks of freshly grated black pepper 
3 scallions, sliced by hand
Handful on cilantro
2 cloves garlic
10 baby carrots or 1 large carrot 
1/2 jalapeno, seeded, ribs removed 
1 egg 
1 cup cooked and cooled Farro (can sub cooked brown rice or panko breadcrumbs) 
sliced deli cheese 
(get fancy, try a spicy gouda or a pepper jack) 
Olive oil for cooking 
Buns 
Arugula, sliced tomatoes and sliced red onion 


Instructions:
Spread black beans on a large baking sheet and bake for 15 minutes at 300 degrees to dry them out. It is ok if they crack open, cool for about 20 minutes.  

In a food processer add garlic, carrots and jalapenos and pulse until chopped.  Add cilantro, beans, 1 egg and all the spices.  Pulse 5-6 times, add farro and pulse a few more times to combine.  
 Form patties and place on wax paper to rest in refrigerator for 30 minutes or longer to help from falling apart.   If too wet, you can add panko, a handful at a time.   


To cook, heat a non-stick to med high heat, add 2-3 T olive oil and fry burgers about 5 minutes on each side 
Add cheese to burger the last two minutes, cover to melt cheese 

Serve on a soft or toasted bun with arugula, tomato, and red onion 


Sunday, September 22, 2019

A Classic Chicken Kebab

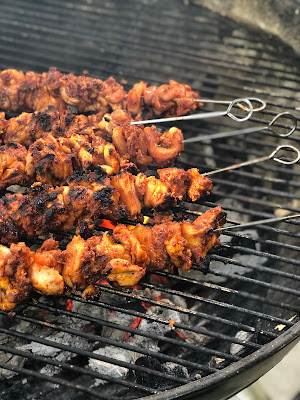
I checked out a few cookbooks from the library looking for inspiration and landed on this recipe from the Cooks Illustrated Meat book.  It seemed too easy and yet perfect.  Pairing boneless, skinless chicken thighs with a spice blend, homemade barbecue sauce and a bacon paste to keep the meat moist. I was intrigued, bacon paste, how does one come up with this idea?   I will tell you;  I made this recipe twice, once to practice before my show and once when we shot the segment and it's perfection.  I didn't change a thing originally however I will add pineapple and red onion chunks to the kebabs next time I make this.  I would also serve with jasmine rice on the side.  In a pinch I would just cut the bacon in 1 in pieces and thread on the kebabs between the chicken pieces.  Also, I love chicken thighs in the recipe but they do require a lot of work to cut the fat off.  Try boneless breasts if you prefer....they are leaner and quicker and the bacon will keep them from drying out.  

As always, you can watch the 3 minute video or click to print the recipe, 
or watch and read the recipe! 


Follow along below or click here to print
Once the recipe pops up, just use your file menu to print

Tailgating Tidbits 
Barbecued Chicken Kebabs
Recipe courtesy of Cooks Illustrated Meat book, 
page 421
c/o Celeste Podojil 


Sauce:
1/2 cup Ketchup
1/4 cup Molasses 
2 Tablespoons Grated Onion (use box grater) 
2 Tablespoons Worcestershire 
2 Tablespoons Dijon mustard 
2 Tablespoons Cider vinegar 
1 Tablespoon Packed Light Brown Sugar 

Chicken: 
2 Tablespoons Paprika 
4 teaspoons turbinado sugar 
2 teaspoons kosher salt 
2 teaspoons smoked paprika 
2 slices bacon, cut into 1/2 pieces 

2 pounds boneless skinless thighs or breasts cut into 1 in cubes 

For the Sauce: 
Bring all ingredients to simmer in small saucepan over medium heat and cook, 
stirring occasionally, until reduced to about 1 cup. This will take about 5-7 minutes. 
Transfer 1/2 cup sauce to small bowl and set remaining sauce aside for serving. 


For the Chicken: 
Combine paprika, sugar, salt and smoked paprika in large bowl.  Process bacon in food processor until smooth paste forms, 30-45 seconds, scraping down sides of bowl as needed.  Add bacon paste and chicken to spice mixture and mix with hands until chicken is completely coated.  Cover with plastic wrap and refrigerate for 1 hour.  Thread chicken tightly onto four 12-inch metal skewers.  

Preheat charcoal or gas grill 10 minutes, oil grates 

Place kebabs on hottest part of grill and grill 2-3 minutes, turn and cook until browned and slightly charred.  Brush top surface of skewers with 1/4 cup sauce, flip and cook until sauce is sizzling and browning in spots, about 1 minute. Brush second side with remaining 1/4 of sauce, flip and continue to cook 1 minute until sizzling and browning.  

Remove from heat, transfer to platter, tent with foil and let rest 5 to 10 minutes.  Serve with reserved sauce. 


Sunday, September 15, 2019

Nothing but a chicken wing

Growing up in South Florida there was a great wing place my good friend, Tara, and I used to frequent at least once a month.  I like to think we had pretty distinguished pallets at a young age because Chez Porkys was very sophisticated for a couple of high school kids!  We always split our wings and ordered them over rice with a side of curly fries (in high school, calories don't count), our favorite sauces were Asian, Lemon Garlic and Butter and the sweetest most delicious Raspberry wings I have ever tasted.   Living in Atlanta I miss Tara and I miss Chez Porkys...I also miss eating curly fries without thinking about how I shouldn't be eating curly fries, ugh.

This recipe pays tribute to my high school days....I give you grilled coconut curry wings with fresh cilantro!  They make great wings on game day!!!  You can also try boneless skinless breasts (dredge in flour first) sauté in a little olive oil and serve with the sauce over jasmine rice.

Yellow Curry Coconut Chicken Wings


Ingredients:
2 pounds of chicken wings 
    and/or drumettes 2 T olive oil
Pinch red pepper flakes
Zest and juice of one lime
Small Red Thai Chilies 
  (as many or few as you want)
2 T curry powder
1 can coconut milk
1 T soy sauce
1 T brown sugar
3 T chopped fresh cilantro
salt and pepper

Make marinade first

In a small sauce pan heat olive oil, red pepper flakes and curry powder over medium heat for 1-2 minutes (do not let burn). 
Add your whole chilis (just slice them open)
Add coconut milk and rest of the ingredients except cilantro
Bring to a simmer over med high heat, stirring constantly.
Taste sauce and adjust seasoning accordingly.
In last minute add cilantro
Take off heat and cool.
Store in a mason jar or air tight container.

Note….you will need to allow to come to room temperature if putting in fridge prior to making wings. 

Grill wings for about 15 minutes on each side, turn often.

Remove wings from grill and place in large storage container with a tight fitting lid. 
Pour yellow curry sauce over wings, cover, shake until coated.

Place on serving dish and sprinkle with fresh chopped cilantro.